
Introduction
The iPhone 16 Pro features a periscope telephoto lens, offering powerful zoom and image stabilization capabilities; however, its intricate structure makes it particularly delicate and susceptible to damage. Drops, dust ingress, or water exposure can lead to focusing anomalies or image instability, necessitating the replacement of the entire camera module to restore functionality. Repairs require specialized tools and precise execution to avoid damaging components such as flex cables. By utilizing the DIYFixTool, the i2C 7-in-1 Mobile Phone Opening Tool Kit, ceramic tweezers, and an air blower, the disassembly and replacement process can be performed more safely—serving as a valuable operational reference for novice to intermediate-level repair technicians.
To understand the camera error before processing
Before setting up the device, it is important to check if the digital camera module is actually faulty. Some digicam problems are caused by software bugs or damaged connectors in preference to failed lens assembly. Restart your iPhone and test all camera settings, especially the optical zoom range. If the teledigicam does not reach consciousness, produces shaky snapshots, or shows black spots, the module may wish to be replaced. Sometimes customers also enjoy Dust in iPhone Camera cases, where debris gets trapped near the lens housing and affects the clarity of the image. Under those circumstances, cleaning can also solve the problem by choosing a perfect alternative.
The iPhone sixteen Pro periscope telephoto camera additionally works closely together with stabilization hardware and internal flex cables. A damaged iPhone image stabilization Flex cable can create image vibration or risky autofocus behavior. Careful examination of the respective components helps to avoid futile treatments. It is often necessary to check the motherboard connector area during magnification before replacing high-priced digicam modules. If the connector pins look bent or rusted, replacing the digicam may not solve the problem at best. Understanding the exact fault saves time and protects the machine from repeated disassembly.
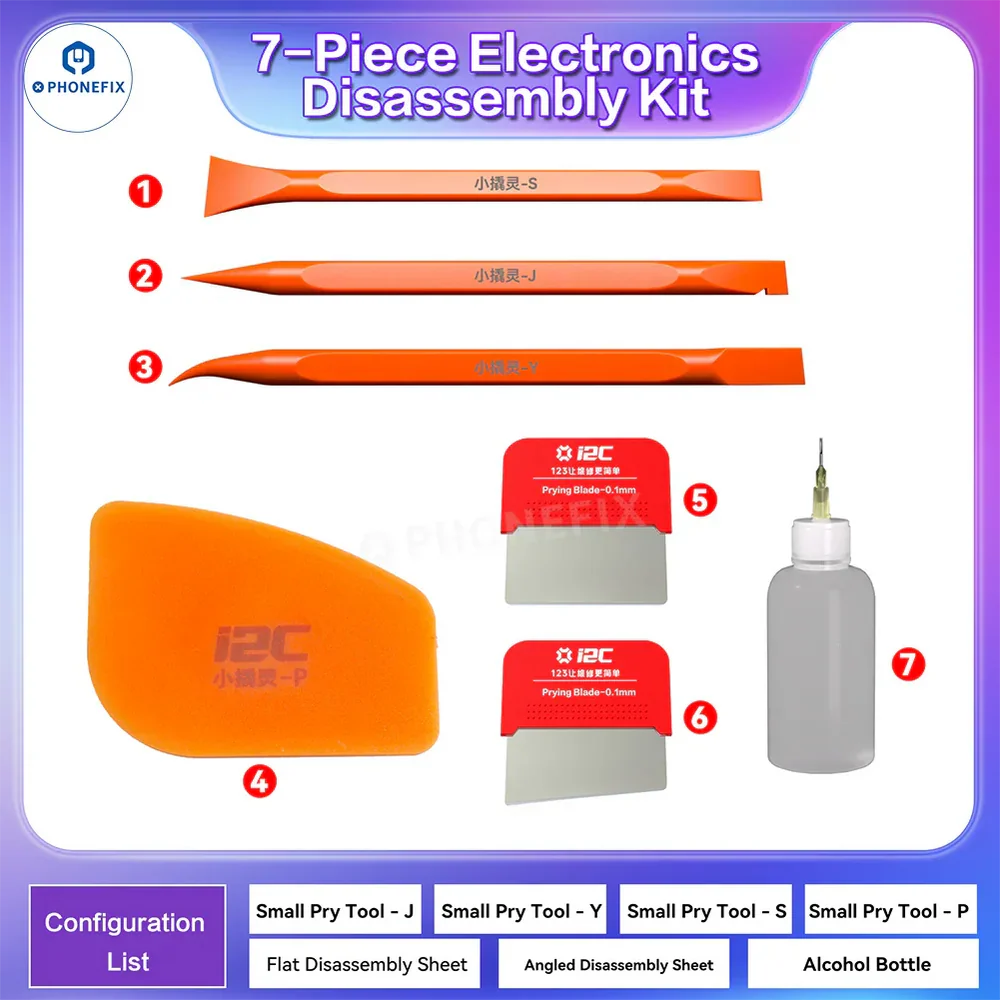
preparation of work area and necessary repair tools
A smooth recovery environment is critical to a successful iPhone camera repair strategy. Small dirt particles or static forces can easily damage camera sensors and internal circuitry. Start by having an antistatic laptop ready with brilliant light fixtures and enough area to organize screw connections. Since the iPhone 16 Pro contains multiple screw sizes, marking each screw location during disassembly and allowing faults to be eliminated during reassembly can also be improved by using a magnetic interrupt mat to improve processing efficiency and reduce the risk of losing components.
Several professional tools are quite recommended for its restoration. The i2C 7-in-1 mobile unlock tool kit is extremely useful as it includes the precise setting tool designed for modern smartphones These tools help to wipe the display safely by scratching the bezel. MECHANICAL ceramic tweezers are preferred for tackling sensitive sockets and adhesive tapes, as ceramic conductors reduce electrical conductivity and protect sensitive circuits from inadvertent shorting A 2UUL CL31 Dust Blower is just as important as it frees dirt from the motherboard and lens out properly. In addition to those tools, assemble a hot air balloon, a precision screwdriver set, more than ninety% isopropyl alcohol, plastic pry gear, adhesive tape, and safety gloves before beginning the restoration .
iPhone Sixteen Pro Unlocks Securely
The first repair step involves turning off the iPhone completely and unscrewing the smallest charging port screws. Place the equipment on a heating pad or use a controlled hot air source to melt the water-resistant adhesive at the edges of the display. The temperature change involved is usually between eighty°C and ninety°C. Avoid overheating your smartphone, as invalid temperatures can damage the OLED display or cause it to be turned off by flex cables. Instead of focusing on a nearby one, apply the heat evenly for about two to several minutes while continuously moving the fresh air and water around the rims.
After the glue has softened, use the suction cup and skin pry tool from the i2C 7-in-1 mobile opening tool kit to gently lift the display open screen slowly from the left side like an e-book due to the show flex cables being attached on the other side. Sometimes in the recovery mode, you will need to disconnect the battery connector first to reduce the risk of electricity. Use MECHANIC Ceramic Tweezers carefully when removing the small metal fasteners that cover the flex connectors. Ceramic tweezers are ideal here because metal tweezers can accidentally slip and cause damage to the table. Once disassembled, the display assembly is effectively zoned away from the work area to prevent scratches or cable stresses.
Removal and replacement of the Periscope telecamera
To launch the device, locate the rear camera assembly near the upper motherboard compartment. The periscope telephoto camera is usually attached under protective brackets and a layer of adhesive foam. Before disposing of any part, search the vicinity for signs of liquid damage or dirt infestation. Use the 2UUL CL31 Dust Blower to easily remove loose dirt particles across the digicam housing. This prevents particles from falling onto the sensor throughout the finishing process and allows the image to hold up well after installation.
Next, disconnect the digicam flex connectors with a plastic pudger. Avoid excessive pressure as the connection socket contacts are sensitive and attach directly to the motherboard. Some technicians prefer to incorporate small amounts of non-smooth current near cascaded connectors because it reduces friction and allows for adequate launch adhesion without damaging nearby solder joints Low residual current is probably all through mobile phone protection because it reduces mobile phone connections. removed, carefully lift the older periscope telephoto camera out of the housing. Carefully compare the optional module to a separate part to verify alignment, connector size, and screw location prior to installation.
Carefully insert the new Periscope telecamera into the housing and securely reconnect all flex cables. Make sure each connector clicks firmly into place, partly due to the fact that connected camera cables often cause a black screen or autofocus. In this step, avoid touching the lens floor without delay with your arms. If fingerprints or dust appear on the lens, use a 2UUL CL31 Dust Blower and a lint-free microfiber cloth for cleaning. Never use an asymmetric liquid cleaner near a digital camera sensor, as moisture can completely damage the internal optical components.
Proper handling of glue, heat and internal components
Modern iPhones rely heavily on water-resistant adhesive and compact internal designs. During restoration photography, proper adhesive handling is as important as replacing the digicam module itself. After removing the old display adhesive, use isopropyl alcohol and a damp plastic scraper to clean off any last bit of debris. This makes for an easy floor to install new waterproof adhesive tape. Uneven glue placement can also allow moisture or dust to get on the mobile, affecting the camera system once again.
Temperature control at some stage during this stage is also very important. The temperature should be kept below 100°C to avoid overheating near components when softening stubborn adhesives near batteries or wireless charging coils Excessively hot air can weaken the battery cells or damage the plastic body mechanism inside the mobile phone. Use short heating times as opposed to extended direct heat transfer. MECHANICAL ceramic tweezers are especially useful for applying adhesive tapes because the ceramic tips can withstand heat and provide first-class precision in the approach of delicate flex cables .
Technicians should also look at surrounding components before sealing the device. Periscope works together with stabilization systems of telephoto cameras and sensor measurement equipment. If the tight fittings are loose or if the foam padding is not available, installing a brand new digicam can additionally also allow the picture quality to go through. Check all screws, grounding materials, and connection brackets before moving them for reassembly. Taking more time through inspections prevents frequent repeat treatments and improves long-term reliability.
Check and verify camera fixes
Once the replacement camera is installed, quickly reconnect the monitor before removing the smartphone completely. Turn on your iPhone and open the camera app now to test the capabilities. Popular images, zoom functions, portrait mode, video stabilization and confirm that all images are correct. Switch between all rear digicam lenses to ensure a smooth transition without freezing or adjusting. If the teledigicam appears blurry or unstable, reopen the device and check the connectors more than once before the very last assembly.
It is equally important to check the best image under different lighting conditions. Move your phone slowly while recording video to verify the stabilization performance. Because the Periscope telephoto digicam contains superior optical alignment designs, even a slightly loose connector can affect identification accuracy. Listen carefully for unusual clicking sounds from the camera module, as this could indicate an incorrect seat or broken stabilizer hardware. If dust specks appear during the test, use the 2UUL CL31 Dust Blower again before completely sealing the display.
Practice applying freshwater resistant adhesive to the display body after confirming successful operation and carefully closing the equipment. Press evenly on the edges to ensure proper sealing. Reinstall the bottom screws and make a final inspection for holes or misalignment. A successful repair should restore smooth zoom performance, clear focus, and strong imaging to best emulate authentic production unit conditions.
Conclusion
Replacing the iPhone 16 Pro’s periscope telephoto camera requires meticulous handling; diagnosing the root cause of the fault beforehand helps prevent unnecessary disassembly and boosts the success rate. Dismantling the damaged module step-by-step effectively safeguards surrounding components and restores camera functionality. By utilizing professional tools—such as the i2C boot-up tool kit, MECHANIC ceramic tweezers, and the 2UUL CL31 air blower—in conjunction with DIY Fix Tool repair solutions, both operational safety and precision are significantly enhanced, ensuring the stability of image quality and overall device performance post-repair.
